Risk Modeler provides a rich set of capabilities for data access and automation via its REST API. It provides access to the data objects that make up exposure (Portfolios, Accounts, Locations, etc.) and results (Metrics & Loss Tables) as well as the processing functionality of Risk Modeler (Geocoding, Running Analyses, Import, Export, Workflows, etc.).
Using the REST APIs is simple and well documented, however developing workflows and business rules to automate Risk Modeler in a way which suits your business goals will depend upon your individual implementation. This post aims to provide an insight into how to develop workflows and automations over the top of the Risk Modeler APIs.
A simple end-to-end workflow
Let’s consider a simple straight through workflow which takes MRI files, imports them, geocodes them and runs a DLM analysis on the imported exposure. If one were to make a diagram of this workflow, it might look something like the below workflow:
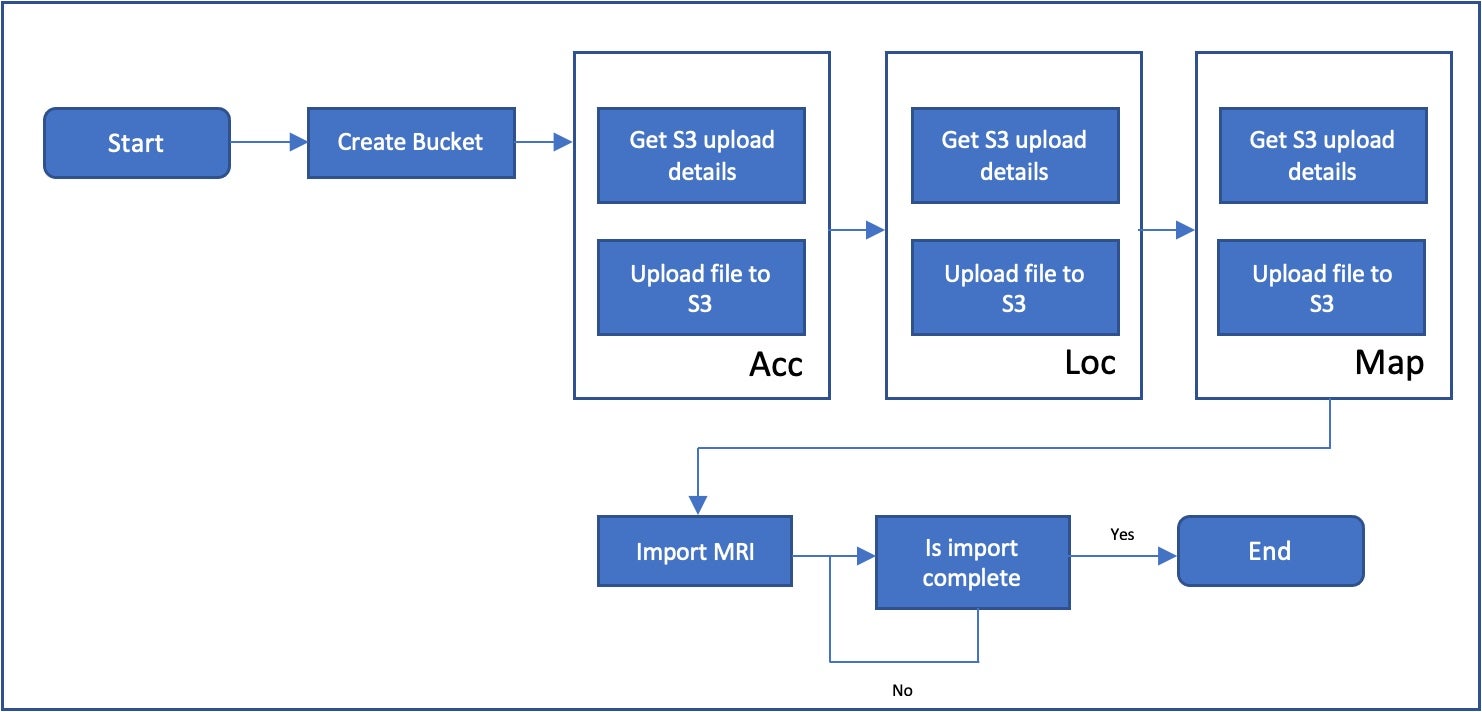
The above diagram looks simple enough, until you start to factor in some of the complexity involved in the individual steps. The first step for instance, Import MRI, this involves the following process:
Create a storage bucket in AWS
Upload Acc File
Get S3 upload details
Upload file to S3
Upload Loc file
Get S3 Upload details
Upload file to S3
Upload Mapping file
Get S3 upload details
Upload file to S3
Create an MRI Import workflow
Monitor for MRI Import completion before moving to the next step
This is a workflow within a workflow. Represented in a diagram, this import MRI workflow looks like the following:
As you can see, it’s already starting to get much more involved, and you’ve only just imported MRI files to Risk Modeler software. At this stage, a couple of things jump out that you should consider standardizing as you’re building out this workflow.
Monitoring Asynchronous Jobs
You’re going to be monitoring asynchronous jobs for completion throughout your integration with Risk Modeler, so you will benefit from separating out the implementation of monitoring the jobs from the remainder of the implementation so that you can call this functionality anywhere you need it.
current_iteration = 0
status = ""
while status != WORKFLOW_COMPLETE and current_iteration < MAX_ITERATIONS:
workflow = client.get_workflow(url)
status = workflow["status"]
print(status)
if status == WORKFLOW_COMPLETE:
return True
if status == WORKFLOW_FAILED:
raise ValueError(f"The workflow {url} failed", workflow)
time.sleep(SLEEP_TIME)
current_iteration = current_iteration + 1
return False
Copy to
The code sample above shows an implementation of a workflow_complete function which takes a RMClient (more on this later) and a url with which to query the workflow status. This function calls get_workflow from Risk Modeler (/v1/workflows/{workflow_id}) and checks the status returned from the workflow API. If the workflow is Finished, the function returns True, if it’s Failed, it raises an Error, if it does not finish or fail before you’ve made 100 calls to get_workflow, it returns False. The calling code is responsible for handling what to do with the workflow completion response.
Separating out this workflow logic enables you to standardize your implementation of the number of attempts to check workflow status as well as the time to wait between requests – NOTE: including a sleep time here is recommended, otherwise this function may make too many calls to the Risk Modeler API too quickly.
Max Iterations and Sleep Time are some values that are defined here which are tuneable as appropriate for your needs. These should be able to accommodate your longest running jobs, but also be quick enough to return responses for quicker running workflows.
Abstracting Common Functionality
The uploading of Acc, Loc, and Mapping files are subtly different, but they share so much common functionality that it makes sense to group them together and be able to abstract away their implementation to generalize the functionality.
Creating an upload_file function that takes all the input parameters into account makes sense in this context. The following code does just that:
Here we’ve defined a DataClass called S3UploadDetails which is a representation of what is returned from Risk Modeler when we ask for S3 Upload Details (/v1/storage/{bucket_id}/path). We’ve also defined another client class, AWSS3UploadClient to handle our AWS S3 communication.
Creating this upload_file function now enables you to call it from anywhere you want to upload a file, regardless of the type of file you’re looking to upload.
Encapsulating Client Implementations
In a couple of locations here, we’ve encapsulated client code for Risk Modeler as well as for AWS. This means you don’t have to concern yourself with the implementation of those clients as you’re building your workflows and they can be developed independently. In some instances, where it makes sense, you also can create data classes to represent some of the objects you’re interacting with in a more strongly typed way and to abstract functionality from your workflow implementations.
The Risk Modeler client you’ve created provides functions as API implementations so that they can be called from the code that needs them. For example, if you want to get a portfolio ID from an EDM based on the portfolio name, you can just call the function get_portfolio_id and pass in the name of the portfolio and EDM into the below function which makes an API call to Risk Modeler.
With these abstractions in place, as well as your client implementations, you can have a much simpler job building a workflow. Now all you need to do is call your abstractions, e.g. import_mri, geohaz and process_account so that it looks a lot more like the business centric abstraction you built in the initial workflow diagram referenced above:
geohaz_workflow_url = client.geohaz_account(arguments.datasource, account_id)
print("Submitted GeoHaz")
if workflow_complete(client, geohaz_workflow_url):
print("Geocoding complete")
else:
raise SystemExit("Geocoding did not complete")
run_dlm_workflow_url = client.process_account(arguments.datasource, account_id, arguments.model_profile_id)
print("Submitted DLM")
if workflow_complete(client, run_dlm_workflow_url):
print("DLM complete")
else:
raise SystemExit("Analysis did not complete")
Copy to
Production Considerations
You’ve seen it’s both easy to make API calls as well as potentially challenging to build complex workflows. Getting the abstractions right as well as implementing the appropriate business logic is where the complexity lies.
Some of the things we’ve not spent much time discussing in this post are testing and error handling. When one is looking to deploy something into production, it’s vital that it’s properly tested (Unit, Integration and Acceptance) and can handle and recover from errors that arise in the process.
If building out a production implementation seems like a daunting task and you could either do with some support in designing/building it out or getting a safe pair of hands to handle the implementation, RMS Consulting can help you in this process. We’ve developed our own tools and frameworks to help both speed up the implementation process as well as ensure it meets high quality standards. Rather than starting an implementation project from scratch, using the Cat Accelerate framework can make automating Risk Modeler more of a turnkey implementation, saving you both money and time. Reach out to your account manager to speak to RMS Consulting about how we can help you with your implementation.
Brian Shek is a Lead System Engineer on RMS’s Consulting team. He works on deploying RMS core products and solution implementations to integrate RMS solutions into clients’ workflow. He is responsible for the deployment, custom configuration, workflow design, and safeguarding. He holds a BS and MS in Electrical Engineering from Binghamton University. Brian is based in the RMS Hoboken, New Jersey office.
Questions or Feedback on Current Blog Posts? Suggestions for Upcoming Blog Posts?


